
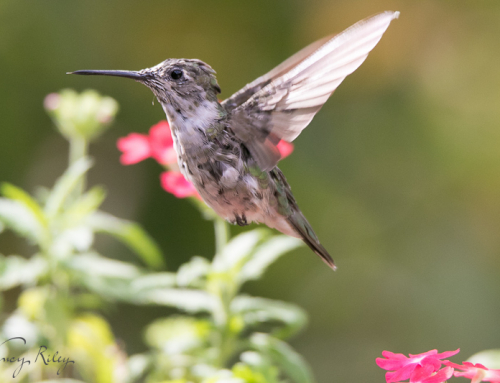
Having spent the better part of the summer obsessing over these little birds, I don’t consider myself an expert, but I offer what I’ve learned so far about photographing them.
1. Attract hummingbirds to a place you can photograph them. We put pots of red salvia, red geraniums, and red and pink nicotiana on our deck to attract their attention. Although I have more than one feeder, I chose to only put one out so I could concentrate on one spot. We cleaned the feeder and refilled it with fresh solution frequently to keep it attractive to the birds.

2. Leave your camera set up on a tripod focused on the area in front of the feeder. When I used a feeder with more than one hole, I taped all the holes shut except one so the focus would be more predictable. I put a thin twig in the feeder to use as a focusing target, then removed it. I used a wireless remote to trigger the shutter when I saw the birds in the right spot. Being behind the viewfinder was much better, so I could adjust the framing and the focus as needed, but some birds are so shy that my presence behind the camera would scare them off, even when my camera was inside the house, shooting through a window. If I shot remotely, I would have to examine the images and adjust the camera for the next visit, hoping it was from the same bird, since they had different feeding and flying habits.

3. Use a feeder that works with you. I originally started with a window feeder. The birds came close to the house, but I was severely limited in the windows I could use to photograph, and setting up flowers to hide the feeder from camera view was time-consuming and painstaking. I bought a feeder on a plant stake so I could place it within the flowers in the pot, and life became much easier. My new feeder only has one hole, and I can point it in any direction by rotating the lid.The feeder lacks a perch, which keeps the birds hovering for longer in front of the feeder. It is simple to clean and has a small volume of a half cup, which makes it easier to change the solution frequently.

4. A multiple flash set-up is the easiest way to photograph hummingbirds. I have managed to get acceptable natural light hummingbird photos as well, but I had to use high ISOs and accept the motion blur in the wings. My flash photos show much more detail and show off the iridescence of the feathers. Because I control the light on the subject and the background with my flashes, I can leave the outdoor studio set up for hours and not worry about having to change my settings due to the changing available light.

5. Allow at least two flashes for the bird. With only one flash, the contrast between light and shadow is too great to look natural, and you have to choose between lighting the back of the bird with the pretty feathers, or the front. (I suppose in a pinch, one could use a reflector instead of a second flash, but a reflector takes up far more room and would block visibility of the set up for both the camera and the photographer trying to keep an eye on things remotely.) I like putting my flashes at roughly a 45 degree angle to the lens axis to start, and then I adjust based on results. The flash that will light the bird’s back is a little higher and angled down a bit, while the flash aimed at the bird’s front is lower and powered down a bit more. (Be careful that the lower flash isn’t so low that it casts shadows from the foreground onto the bird.) I set the flashes around 1/16 to 1/32 power to start, and usually somewhere between 15 and 18 inches away from where I think the bird will be. The flashes are mounted on Phottix Strato radio receivers, which work well for me.

6. Allow at least one flash for the background. Unless you want the background to go dark, you will need to light it as well. With a simple background of paper, one light will do. With a complex background, like greenery, additional flashes to reduce shadow contrast would be better, but since I don’t have additional flashes, I found it easier to switch to paper. Besides, I got better feedback when I used backgrounds with colors that contrasted better with my green hummingbirds. I create the colors by putting gels on the flash that came in a sample pack from Rosco. If I want a darker color, I use a lower flash power (usually I start at 1/16), and if I want more saturated color, I use a gel with a lower light transmission percentage. Moving the flash closer to the background gives you more of a gradient of color, and moving the flash away gives you more even color. Of course, you also need to adjust flash power when you move the flash closer and farther from the background. If you use a natural foliage background, you will need to keep it as far from the subject as possible to keep it blurred. I could only get the background about 10 feet (3 meters) away based on the size of my deck, and I felt that wasn’t really blurred enough, which was another reason I switched to paper.

7. Maximize depth of field with your camera settings. I use at least f/16 with a focal length of 200mm and my camera about 4 feet (1.2 meters) from the subject. This gives me a little wiggle room for focus of about 3/4 inches (1.8 cm). It’s still not much, but it is certainly better than what I could get with f/4 or f/2.8! I need ISO 200 or 400, depending on how close I’ve moved my flashes in, and I use a shutter speed of 1/250 second, to match my sync speed. I mistakenly set it for 1/400 once in a rush, and I cut off the bottom of what would have been some amazing images. (If you exceed the sync speed of the camera, the bottom part of the image doesn’t get exposed to the flash and goes dark.) The good thing is the images still highlighted God’s amazing creation, while my technical errors remind me to stay humble.
8. Be patient. I have spent literally hours watching the window without getting to take a single shot, except for test shots of the lighting and focus. I have taken numerous studies of birds halfway into the frame, bird tails retreating in the distance, and empty frames where the bird got away entirely. Often, the bird was out of focus or the wings were over its head. There were pesky hard light shadows cast by a wing making the flash obvious. Most frustrating were the ones with the birds with beautiful wing position, but the wing or tail were clipped by the edge of the frame. You may notice there are no hummingbird pictures with the cyan background you see in the set up. That’s because no hummingbirds came to the feeder for two days. Learn to be philosophical.
9. Watch your birds, even when you’re not photographing them. All our feeder patrons have been either female or juveniles, and I couldn’t tell any of them apart by appearance. However, they did act differently, in the directions they tended to take off, where they liked to rest, and if they were afraid of the flash. When a hummingbird finishes feeding, watch how far she goes. If she perches nearby, chances are that she will return to the feeder after a few minutes, giving you a chance to take up residence behind the camera and adjust the camera position as needed.
10. Respect the talent. I try to remember that these are God’s creatures first and try not to do anything that would hinder their survival. I avoid disturbing the birds when they are drinking and let them get filled up a bit before I take any flash photos. At least one of our birds liked to taunt me by feeding, then darting down out of flash range while she hovered in between sips. I didn’t get good pictures of her in flight, even though she liked to partake of the house beverage regularly, but she was still fascinating to watch. Even though I may not be successful in photographing each bird who comes to call, I can appreciate her acrobatic agility, and that can be reward enough.


Leave A Comment